
As I mentioned in my previous blog(Introduction to Lightning Aura Component), Salesforce supports 2 different programming modules.
- Lightning Aura Component (LAC)
- Lightning Web Component (LWC)
Since LWC is a big topic we will cover just introductory part in this blog. So the question is –
What is Lightning Web Component (LWC)?
Lightning Web Component is a new programming module in salesforce. LWC are light-weighted custom HTML elements built using HTML and Javascript. Both LWC and Lightning Aura Component appear as Lightning Component in salesforce.
When you build a custom Lightning Aura Component or Lightning Web Component and save it in salesforce org, you can access these components in Lightning Page as Custom Lightning Component. There is no separation for both components.
There is a difference in code that you write in LAC and LWC. I had elaborated LAC in the previous posts. In this post we will see what are the setups required to start developing a LWC. In next post we will see basic files and other details of LWC and also a simple working LWC component.
Before Creating a Lightning Web Component we need 2 applications
- Salesforce DX.
- Visual Studio Code.
Salesforce DX.
We will not discuss in details about Salesforce DX in this post. But one thing is for sure, SFDX is required for development and deployment of LWC in salesforce. It also provides a facility to create a temporary ORG which is called as Scratch Orgs
Scratch Orgs.
The scratch org is a source-driven and disposable (Temporary) deployment of Salesforce code and metadata. A scratch org is fully configurable, allowing developers to emulate different Salesforce editions with different features and preferences. Scratch orgs can be shared with other team members as well. It also drives productivity and collaboration during the development process.
As we all know Salesforce works in ‘Multitenancy’ architecture. There are some limitations in creating scratch org as well.
Scratch orgs have these storage limits:
- 200 MB for data
- 50 MB for files
There are limitations in numbers of scratch orgs that can be created per edition on daily basis.
| Edition | Active Scratch Org Allocation | Daily Scratch Org Allocation |
| Developer Edition or trial | 3 | 6 |
| Enterprise Edition | 40 | 80 |
| Unlimited Edition | 100 | 200 |
| Performance Edition | 100 | 200 |
Set up Salesforce DX.
Use the link to download SDFX from Salesforce trailhead. You can choose application as per OS and bits.
Post setup you may have to setup environment variables.
Visual Studio Code.
Visual Studio Code is a lightweight but powerful source code editor which runs on your desktop and is available for Windows, macOS and Linux. It comes with built-in support for JavaScript, TypeScript and Node.js and has a rich ecosystem of extensions for other languages. For Salesforce Lightning Web Component also Visual Studio code is helpful. It helps to debug code at coding time, meaning Debug code right from the editor. Launch or attach to your running apps and debug with break points, call stacks, and an interactive console.
Installing Visual Studio Code from its official website.
There are few plugins which will be helpful for you in building LWCs. You have to add these plugins after Visual Studio Code is installed.
- Salesforce Extension Pack
- Salesforce CLI Integration
- Salesforce Apex Debug
- Aura Component
There are many more plugins which you can install as per your requirement.
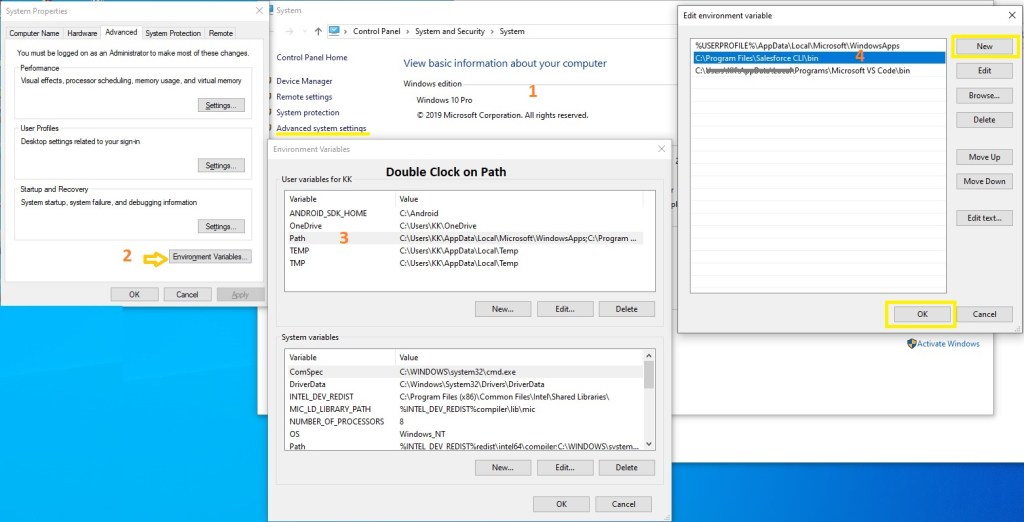
Setting Environment Variables
After you install you may have to set environment variables.
Setting environment variables for Salesforce DX.
You need to select the path where you installed Salesforce DX till bin folder. If you have installed a Salesforce DX in ‘c’ drive and Program Files folder(Default setup location), then you can select the path as
‘C:\Program Files\Salesforce CLI\bin’
Copy the path and follow below steps (These steps are for Windows 10 OS).
Step 1: Go to desktop, right click on This PC(My computer icon) – Click on Properties.
Step 2: On the left side of the window, Click on Advanced system settings.
Step 3: Click on Environment Variables
Step 4: In User Variables section – Double Click on Path and click New
Step 5: Paste the above URL drive path and Click OK. Close all windows.
Enable Dev Hub
You can enable Dev Hub in Developer edition or in Production environment of any org. Enabling Dev hub is simple, but you cannot disable it once it is enabled. You may need to take proper permission from client or business representative.
Steps to enable Dev Hub.
Step 1: After login, Go to Setup.
Step 2: In Quick Search “Dev Hub”. – Click on Dev Hub.
Step 3: Click on Enable Dev Hub toggle button.
