
<lightning-record-edit-form />
Use the lightning-record-edit-form component to create a form that’s used to add a Salesforce record or update fields in an existing record. If you need a solution with custom screen, you need to use this tag. Whole layout need to be customized. The component displays fields with their labels and the current values, and enables you to edit their values.
lightning-record-edit-form supports the following features.
- Editing a record’s specified fields, given the record ID.
- Creating a record using specified fields.
- Customizing the form layout
- Custom rendering of record data.
If there is no customization required then you can go ahead with <lightning-record-form /> tag for development.
You need to bind all the fields which you want in custom layout using <lightning-input-field /> tag. This tag will auto selects the type of field as per field data type. It will also handle all the Field Level Securities, Standard Lookup field (No need to customize lookup field like we do in aura) and also Dependency picklists.
Few important attributes of <lightning-input-field /> tag are
- field-name
- read-only
- required
field-name
API name of the field that you want to add on the custom layout
read-only
Specifies whether an input field is read-only. This value defaults to false. A read-only field is not disabled by default.
Not supported for the following field types: rich text, picklist, multi-select picklist, and lookup.
required
If a field in is not a required field at object definition level, but you want to force the user to enter a value to that field, you can explicitly mention it as a required field.
There are few more attributes you can consider as per requirement. For more details please refer Salesforce Component Library.
<lightning-record-edit-form /> tag has some important attributes.
- object-api-name
- record-id
- record-type-id
There are few more…
object-api-name
‘object-api-name’ as name suggests you needs to mention the API name of the object on which you want to perform the operation. This is a required attribute. No matter what kind of operation you are performing like create or edit you have to mention the API name of the object on which the operation will be performed.
record-id
This attribute is required when you are performing edit operation. You need to mention the record id of the record on which you are performing edit operation.
record-type-id
This is a required attribute if there are multiple record types in an object. You have to mention the record type Id of the record that is in operation. If there are no record types then there is no need of this attribute.
Here we will see a small example with a lookup field and dependency picklist. I am including a CSS file for styling which will demonstrate the use of CSS styling in LWC.
html file of lightning component bundle.
<template>
    <lightning-record-edit-form onsuccess={handleSuccess}
                                object-api-name="Contact"
                                record-id={contactId}>
        <div class="White_BackGround">
            <div class="slds-grid">
                <div class="slds-col slds-size_1-of-2">
                    <!-- Your lightning-input-field components here -->
                    <lightning-input-field field-name="AccountId"></lightning-input-field>
                    <lightning-input-field field-name="Title"></lightning-input-field>
                    <lightning-input-field field-name="Category__c"></lightning-input-field>
                </div>
                <div class="slds-col slds-size_1-of-2">
                    <lightning-input-field field-name="FirstName"></lightning-input-field>
                    <lightning-input-field field-name="LastName"></lightning-input-field>
                    <lightning-input-field field-name="Sub_Category__c"></lightning-input-field>
                    <!-- More lightning-input-field components here -->
                </div>
            </div>
        </div>
        <lightning-button class="slds-m-top_small" type="submit" label="Create new"> </lightning-button>
    </lightning-record-edit-form>
</template>
JavaScript file of lightning component bundle.
import { LightningElement } from 'lwc';
export default class New_Lightning_Edit_Form_Test extends LightningElement {
accountId;
contactId;
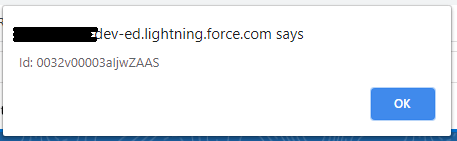
handleSuccess(event) {
this.contactId = event.detail.id;
alert('Id: '+event.detail.id);
}
}
Metadata-XML file of the lightning component bundle(Configuration file).
<?xml version="1.0" encoding="UTF-8"?>
<LightningComponentBundle xmlns="http://soap.sforce.com/2006/04/metadata">
    <apiVersion>48.0</apiVersion>
    <isExposed>true</isExposed>
    <targets>
        <target>lightning__RecordPage</target>
        <target>lightning__AppPage</target>
        <target>lightning__HomePage</target>
    </targets>
</LightningComponentBundle>
Style file
You need to create an additional file in the same Lightning web component folder.
Step 1: Go to visual studio code – locate LWC_Component_Name folder

Step 2: Right clock on the folder of LWC_Component_Name – Select ‘New File’.
Step 3: Name of the file should match the name of the LWC_Component_Name folder followed by .css
Ex: If your LWC name is My_Lightning_Web_Comp. then style file should be saves as My_Lightning_Web_Comp.css
.White_BackGround {
    background-color: white;
}
Here we can create style class just like normal css styling. Nothing specific to Lightning web component as it used to be in Lightning Aura Component(.THIS).
For information on the different files that are created please refer my previous post.
In this example I have deployed the source to Org and added the component to the home page.
I am able to include the component on home page as I have mentioned the target location as
<target>lightning__HomePage</target>
And also
<isExposed>true</isExposed>
(True – exposed to use in pages in lightning).
Output:
Sample output of form.

Sample data entry

As per our JS code, An Alert message should pop-up which will display “Id: <Record-ID>”
If you view the record in the detail page.

Note:
- Use lightning-record-edit-form if you are looking custom solution for create and edit screen.
- You cannot use lightning-record-edit-form for view mode.
- Using
lightning-record-edit-formto create or update records with Apex controllers can lead to unexpected behaviors. - Data provisioned by Apex is not managed and you must handle data refresh by invoking the Apex method again on your own.
- This component doesn’t support all Salesforce standard objects. For example, the Event and Task objects are not supported.
- External objects are not supported.
- All Field Level Validation and Data Service Errors are handled automatically.
- Use custom validation rules to verify data input instead of implementing client-side validation errors.
Resources:
